
Back Health and The Foundation
I will load each week’s content below in the tabs. The most current week will show first in blue, but you’ll be able to click the boxes in grey beside the blue tab to view previous content.
One inspiring cue:
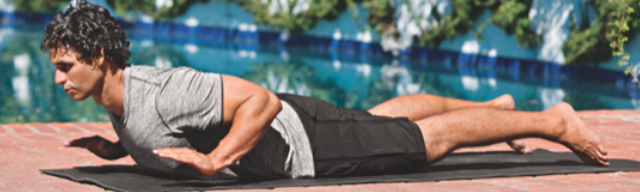
Salabhasana with Adductor-Assisted Back Extension
This is a version of week one’s pose. If you missed week one, you can check it out here. Begin on your belly with your elbows bent and your palms on the floor under your shoulders. Your legs will be extended long on your mat behind you as if you were preparing for traditional locust pose. Start to squeeze your inner thighs, knees, and feet together as you lift just your chest off the floor. Remember to keep your neck long by looking down or slightly forward.
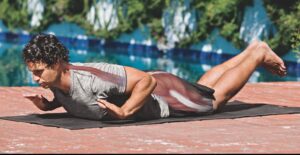
Maintain the squeeze of the legs and lift just your feet off the floor about six inches (see picture above). Your knees will stay on the ground as you continue squeezing them together, along with the feet and inner thighs.
If you’ve ever tried giving a student a block to squeeze between the legs to relieve tension in the low back, this concept provides similar benefits – more space, less lower back compression, and the ability to work back strength more comfortably and safely.
Finally, don’t forget about decompression breathing as you practice this variation! I know I keep saying it, but this technique is truly magic for me. It creates so much length in my low back which allows me to find more space as I come into my backbends. Did you miss my Favorite Find from week two on how to practice decompression breathing? No worries! Click here to discover this magical breathing technique.
Why?
As with all of our poses this month, we are focusing on working the posterior chain. This particular version of Salabhasana works a number of the muscles on your posterior chain when you squeeze your knees and feet together. By doing this, you end up tractioning the pelvis and, ultimately, your lower spine. How do you ask?
According to The Foundation, “the adductors originate in the pelvis and attach to the knee. Contracting these muscles pulls the pelvis down and alleviates compression of the lower spine.” Check out the image below to fully grasp this cool anatomy concept!

One inspiring song:
“The Lotus of a Thousand Petals” – Om Divine in the Key of B
One inspiring quote:
“Everything is energy and that’s all there is to it. Match the frequency of the reality you want and you cannot help but get that reality. It can be no other way. This is not a philosophy. This is physics.” – Albert Einstein
Kneeling Founder Pose (Variation of Child’s Pose)
Step 1: Begin in traditional child’s pose.
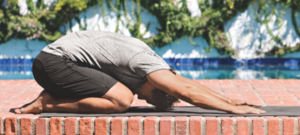
Step 2: Slide your hands by your hips as you lift your chest up. Your hips will lift off of your heels as your low back goes into extension.
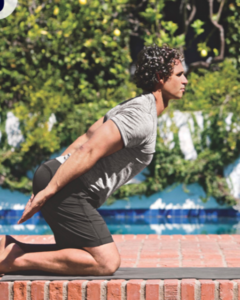
Step 3: If your back feels okay, then reach your arms overhead as shown below.

Try pressing gently into your shins as you push your hips back and hinge forward at your hip crease. The idea is to feel a bit of tension at the low back to hold you in place.
To make the most of this child’s pose variation, work with decompression breathing (lifting the ribs away from the pelvis) to help create more space in your low back. If you missed the quick video on how to practice decompression breathing, click here. I’ve been using it a lot and love it!!
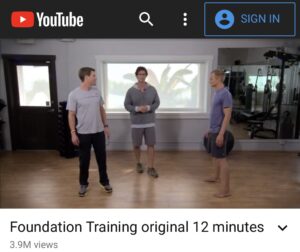
My Favorite Find this week is a 12-minute Foundation practice. I’ve been doing it every other day and find it challenging (in a good way)! The practice is made up of yoga poses you know and love with a focus on the posterior chain. Click below to check it out!
Why?
According to Dr. Eric Goodman, “this exercise will teach your body to go from flexion to extension. First, you put your back into a flexion stretch, then you engage in an active constriction of the posterior chain muscles. When you raise your arms, you will isolate tension at your lower spine. You will be able to flex farther at the hip joints and isolate your lower-back muscles.”
As with anything new, work progressively and at your own pace. Maybe begin with just steps one and two for a few weeks, and then add on the lifting of the arms once you feel more comfortable and strong in the pose?
One inspiration tip:
Start in traditional child’s pose and then lift up to the Kneeling Founder variation with your arms back by your sides. Begin alternating between steps 2 and 3 a few times and then go back to traditional child’s pose to rest. I like to inhale as my arms lift overhead and exhale as they come back to my sides into slight extension. This will challenge your back a little bit so be mindful. While you never want to overtax your back, you do want it to be strong enough to help support you when doing different activities.
One inspirational song:
“Tiny Dancer” – Ronan Remix by Urban Love, Dew, Ronan
One inspirational quote:
“Yoga is not about tightening your ass, it’s about getting your head out of it.”
– Eric Pascal
Not my usual kind of quote, but thought it fit in with the theme this month. =)
One inspiring cue:
Foundation Decompression Breathing
Place your thumbs at the bottom of the ribcage and your middle fingers (or pinkies) at your hip points/ASIS (refer to the picture above). Before you begin breathing, find some upper back length by lifting the base of your skull up and away from your shoulders. The bottom of your chin should be parallel to the ground.
As you inhale, feel your ribcage expand three-dimentionally as your low ribs lift away from your hip points. With every inhale, try and increase the distance between your thumbs and middle fingers. With each breath, you want to feel your upper back ribs expand outwards, as if you’re filling out the shell of a turtle. Click here for this week’s Favorite Find on how to use a scarf/yoga strap to help get the necessary expansiveness in the back ribs.
As you exhale, keep your ribcage expanded and elevated as you pull your belly in and up, away from your waistband.
This particular breathing technique is used in many of the Foundation poses. I find it magic to create length in my low back. I highly recommend watching the 4-minute instructional video, which will show you exactly how to practice decompression breathing. Click below for the video, which is this week’s Mini Training.
Why?
By lifting the ribcage up and away from the hips, you help create more space by stretching the fascia in the low back where there is a tendency to feel compression (hence the term “decompression breath”). Remember, a key to this breathing technique is to keep the ribcage lifted and expanded not only on the inhale, but also on the full exhale.
Eric Goodman explains that by lifting and expanding the ribcage as you inhale, you get an added benefit of priming the muscles for your next exhalation/contraction, giving visceral organs room to function optimally. The technique also enables “bigger breath”, as the more substantial portion of the lungs is on the backside of the body. Thus, breathing into the imaginary turtle shell and expanding the back ribs helps fill the backside of the lungs, where we often miss out sending the breath.
Note: Even though I have incorporated Foundation work into my practice over the years, I only recently added decompression breathing while in many of the yoga poses. It is a game changer for me! I feel space created in my low back with each breath, and it helps me find a long and neutral spine in each pose. However, you do not ALWAYS need to breathe like this. You can practice it in a few yoga poses or even while sitting in the car or at your desk. Use it whenever you want to create more length in your low back!
One inspiring tip:
Stand back against a wall when you first begin to practice decompression breathing. You should feel the back of your head grazing the wall, with the bottom of your chin parallel to the ground, ensuring the back of your neck is nice and long. Without leaning forward or rounding your shoulders forward, use the wall for feedback as you breathe in and fill up the imaginary turtle shell on your upper back ribs. Then, continue the breathing method in its entirety as described above.
One inspiring song:
One inspiring quote:
“Practice the pause. Pause before judging. Pause before assuming. Pause before accusing. Pause whenever you’re about to react harshly and you’ll avoid doing and saying things you’ll later regret.”
– Lori Deschene
One inspiring cue:
Salabhasana: The Foundation Way
Prepare to come into the pose on your stomach with your arms extended out long in front of you. Your feet will stay on the ground as you pull your elbows back as far as you can towards your heels and hug your elbows (hard) towards your body. Use the engagement of your shoulder blades drawing in (adduction) to hug your elbows in. Then, inhale just the chest up for the full expression of the pose.
Note: While the shoulders will naturally lift off the ground due to the fact that you’re coming into a backbend (spinal extension), most of the shoulder lift is coming from the shoulder blades drawing in and down (depression).
Why?
Eric Goodman explains that practicing Salabhana the Foundation way will “tighten your midback, and the position will pull you into forceful extension. This is a real strengthener that stabilizes the muscles at the base of the spine.” The key is using the shoulder blades and keeping your feet on the ground for this version of the pose. Reference the images below for a step by step guide to practice on your own.
Step 1: Starting position
Step 2: Shoulder blade engagement as arms lift
Step 3: Full expression of the pose as you inhale up
Step 4: Exhale as you let your chest relax back down
One inspiring tip:
Work with repetition by practicing the above cue 15 times. Inhale each time you lift up and fully engage the shoulder blades. Exhale as you relax the shoulder blades and lower the chest slightly back down (notice how in image 4 above the upper body is not completely back down on the ground). Also, make sure your hands stay lifted as well to maintain some upper back engagement throughout this practice. According to The Foundation, “the repetitive contraction and relaxation of this back extension with a shoulder blade squeeze will begin to block pain receptors.” Wow!
One inspiring song:
“All By Myself” by Whilk & Misky
One inspiring quote:
“He who experiences the unity of life sees his own self in all beings, and all beings in his own self, and looks on everything with a partial eye.” – Buddha