I will load each week’s content below in the tabs. The most current week will show first in blue, but you’ll be able to click the boxes in grey beside the blue tab to view previous content.
Happy Wednesday!
I hope you had a chance to look at the Downdog cues I’ve shared this month to see if slight changes in how you practice the pose can impact your body for the better. Click here to go to my website to explore July’s Weekly Inspirations.
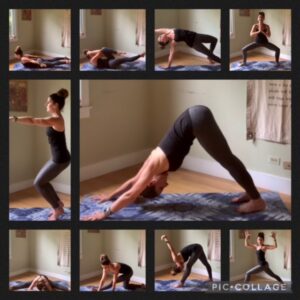
You can implement the cues in my 78-minute flow that moves you through a well-rounded class with extra cues for Downdog. Click here or on the class preview collage below to go to my website for this video.
For this week, I have a short class for you to do at the end of the day or right before you go to bed. It’s relaxing and all you need are two pillows or a bolster. You can even do this practice in bed, if you’d like! How nice to be able to stretch a little and breathe deeply before you nod off for the night!! Click here to go to my website for this restorative video.
On another note, if you know me personally, you know I am always sharing food ideas and finds. Just like yoga, I read whatever I can get my hands on about nutrition and health. I have learned over the years that deciphering high-quality content and studies from the mediocre is not always easy. So, to help me stay up to date and educated, I have decided to take my love of a healthy lifestyle a step further. I am embarking on a 10-month program where I will become certified as a Functional Nutrition Counselor! I AM SO EXCITED!!! After researching many programs, I decided on Full Body Systems because it is steeped in anatomy and physiology and helps to get to the root of an issue in order to understand the “why” behind the cause. You know I love to know the WHY!
Don’t be surprised if you start to see some nutrition nuggets shared in my upcoming newsletters!!
One inspiring cue:
Once in Downdog, “try to press firmly into the entire span of your hands and the length of your fingers, paying close attention to rooting the knuckle of the index finger.”
The wording of this cue comes from Mark Stephens, a Certified Yoga Therapist and author of many best-selling books, including Teaching Yoga. I’m sure you’ve heard to “root” more through the index finger and thumb, but I happen to really like the way Mark Stephens expresses it.
Why?
Simple. This is a great way to balance out the pressure on the wrist joint. You can play around with how much or how little to root down through the hands in order to take pressure out of your wrists…it will be different for everyone!
One inspiring tip:
Try and initiate the rooting action from the top of the arms. You’ll want to feel the “rebounce” effect created by this rooting action in order to get the sensation of more length through the wrist, elbow, and shoulder joints.
If you missed Week 1’s newsletter with cues and tips for the legs and knees (lower body) in Downdog, click here. And don’t miss last week’s 78-minute Flow that gets it all in, while focusing on different cues and variations for Downward Facing Dog! Click here or on the class preview collage below to check it out!
One inspiring song:
One inspiring quote:
“You can be in Downward Dog, hating every second of it. Or you can be in this pose, peaceful and non-reactive, breathing calmly. Either way, you’re in this pose. You decide the quality of your experience. Be the thermostat, not the temperature.”
– Lisa Genova
I LOVE the idea of being the thermostat and not the temperature for any challenging event in life!
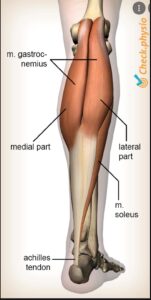
I’m fairly sure that unless you’re in a yoga class that does not incorporate any upper-body work, you will find yourself in a Downward-Facing Dog at some point (probably multiple times) during your practice. Downdog has a plethora of benefits, including stretching the hamstrings and soleus/gastrocnemius muscles (lower leg muscles), lengthening the spine, strengthening the shoulder girdle complex, and even offering an inversion where your head is lower than your heart. I would say that is a pretty awesome pose! Let’s get to this week’s class, which focuses on…Downdog!
I have a 78-minute flow for you that really “gets it all in”, especially some focused cues and interesting variations for Downdog. Click here or on the class preview collage below to go to my website for this week’s video.
Happy July! I’m fairly sure that unless you’re in a yoga class that does not incorporate any upper-body work, you will find yourself in a Downward-Facing Dog at some point (probably multiple times) during your practice. Downdog has a plethora of benefits, including stretching the hamstrings and soleus/gastrocnemius muscles (lower leg muscles), lengthening the spine, strengthening the shoulder girdle complex, and even offering an inversion where your head is lower than your heart. I would say that is a pretty awesome pose! Let’s get to this week’s cue!!
One inspiring cue:
Once in Downdog, start with the inside edges of your feet parallel to each other. Then, turn your heels out slightly so that your kneecaps are turning in just a little bit.
Why?
One of my go-to teachers for yoga anatomy is Judith Lasater, who is a Physical Therapist and long-time yoga instructor. She explains that when you turn the heels out slightly in Downdog, you “stretch the inner calf and help internally rotate your thighs. The inner calf muscle is much larger than the outer muscle and, for most people, it typically needs more stretching.”
In Judith’s book, Yoga Myths: What You Need to Learn and Unlearn for a Safe and Healthy Yoga Practice, she shares how the kneecaps needing to face forward in poses like Mountain and Downdog is a myth. Why? “The reason your kneecaps face inward is because of the nature of the relationship between the head of the femur and the hip socket.” When you apply the cue of turning your heels out slightly in poses where the knee is fully extended, you are helping the kneecaps get into a slightly internally-rotated neutral position. When you are in neutral at the knee joint there is less wear and tear, hopefully leading to less strain and pain over time.
Give this a try! Stand in front of a mirror in Mountain pose with the pinky-side edges of your feet parallel to the outside edges of your mat and look at where your kneecaps face. Inward? Forward? Outward? Are they symmetrical? According to Judith, we want them facing slightly in. If the kneecaps look like they are facing straight ahead, this would actually mean your femur (upper thigh) was externally rotated. Again, neutral position for the kneecaps is for them to be slightly internally rotated when the knee is fully extended. If your kneecaps are facing forward or slightly outward when you look in the mirror, and you have been suffering with knee pain, her recommendation is to see a physical therapist who specializes in manual therapy. Remember, there can be many causes of knee pain…the kneecap not lining up correctly due to muscle imbalances or tissue tightness is just one of them.
In general, the more our bones stack and align, the longer we will have healthier joints. This doesn’t mean we never take them out of alignment but, when we do, we want it to be in a controlled fashion. The idea is to strengthen our joints “out of alignment” on occasion so we stay strong in the many positions our bodies make throughout the day. The majority of the time we do want to focus on good alignment. Make sense?
One inspiring tip:
I’m going to call this the “Downdog Dance”. Begin your Downdog with the inner edges of the feet parallel to one another and feel the stretch. Then, lift your heels and turn them out slightly. Place the heels on the ground and feel this stretch. Dance back and forth between feet parallel and heels slightly out while in Downdog. Can you feel the difference in the stretches? I do!!
One inspiring song:
“Young Souls” by Broken Back
One inspiring quote:
“Talk about your blessings more than you talk about your burdens.”