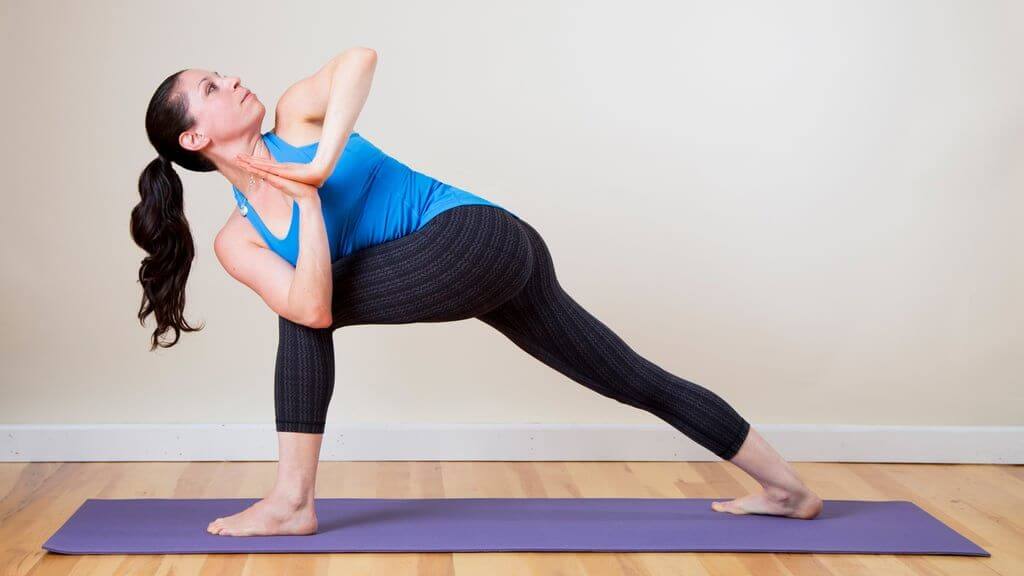
Revolved Side Angle

- Week 1: Revolved Side Angle
- Week 2: Revolved Side Angle
- Week 3: Revolved Side Angle
- Week 4: Revolved Side Angle
One inspiring cue:
Allow the pelvis to rotate slightly in the same direction the spine is rotating. I know…this goes against everything we were taught! I promise there is good reason to consider doing this as I will explain below!!
Why?
According to Jason Crandell, who leads teacher training programs, is a contributing editor at Yoga Journal, and presents at workshops all over the world, the spine and pelvis function better when they move together. He says that it is “one of the most effective ways to minimize injuries since cohesive motion distributes the mechanical stresses of the yoga postures. This means that if you don’t let your pelvis rotate in the direction that your spine is rotating, you are more likely to concentrate stress in the sacro-lumbar and sacro-iliac (SI) region.”
Roger Cole, PhD is an Iyengar-certified yoga teacher and Stanford-trained scientist who specializes in human anatomy. He agrees that the spine and pelvis should be treated as one unit in twists and says, “instruct your students not to rotate the sacrum faster than the pelvis. Rather than insisting that they hold the pelvis rigidly in place, allow them to let it turn a little along with the twist. Teach them that when the pelvis stops turning, the remaining twist should not come from the SI joints but from rotation higher up on the spine and trunk (that is, from joint movement of the thoracic vertabrae and ribs).”
To learn even more about the cohesive movement of the spine and pelvis in twists, click here to read my blog on safe twists and/or below for this week’s Mini Training for some more anatomy insight into the SI joints.
One inspiring tip:
From any seated or standing position, keep your hips “square” to the front of the room, place your hands at your heart in a prayer mudra, and twist to the right using just your muscular effort and not your arms to help you. Take note where your heart is aiming at the end of your twist. Now, before you twist again, draw your right hip back and left hip slightly forward and then repeat. Where is your heart facing now? You probably notice it went a little further. Interesting, right?
Here’s my theory on this. Besides the fact that it is now believed we should be twisting from the pelvis for the health of our SI joints, I also think that students who push a little too much in the twist feel they are able to go deeper and still feel good when they allow the pelvis to rotate slightly. There is less likelihood of overstretching the ligaments in the back because they don’t feel like they need to push as much to get that deep twist their body is craving. Remember, we don’t want the spine to be overly flexible or mobile but some gentle movement, especially in twists, can be very beneficial.
One inspiring song:
“Everything Goes” (instrumental) by Poolside
One inspiring quote:
“Balance is not something you find. It’s something you create.”
One inspiring cue:
While in revolved side angle, attempt to straighten the front leg by pressing the front foot down into the mat. The front leg does not actually have to straighten at all, it’s the action of pressing the front foot down and getting stronger activation of the front leg that’s important here.
Note for this cue: Depending on where your individual strengths and weaknesses are, you will have to decide for yourself how much to press into your front foot. This goes for any of the cues where you hear to press, push, or activate. The amount of engagement could differ greatly from student to student.
Why?
I got this cue from Ray Long and while there is no actual science behind the cue itself, it definitely can help create more strength and stability in this twisting pose. As you probably know by now, using your legs in any pose keeps you from just “hanging out” and ensures your body is active and engaged. In this case, pressing into your front foot as if you were trying to straighten that leg activates many muscles, including the glutes. Next week we will go into more detail on the important role of the glutes in a twist. For now, try out this cue and see if it gives you a stronger sense of stabilization as you twist.
Want to see a really cool video that will show you what muscles are working and stretching while in revolved side angle? Check out the video below. For me, visualizing the muscles actually engaging and/or stretching can change how I approach the pose and ultimately how it feels…for the better!
Imagine a thick belt around your outer hips once you are in revolved side angle. As the belt gets tighter, think about your hips squeezing in towards each other as you engage your glutes. According to yoga therapist Robyn Capobianco, as we activate the gluteal muscles, we help to prevent uncoupling of the SI joint. If you’re letting your pelvis rotate (as we discussed in the week 1 cue), and you then engage the glutes, you will create more stability in the low back (and SI joints) while allowing the mid and upper back/thoracic spine to gently rotate.
One inspiring song:
One inspiring quote:
“I closed my eyes to look inward and found a universe waiting to be explored.”
– Yung Pueblo
One inspiring cue:
As you twist to the right in your revolved side angle, draw your right shoulder blade down your back and squeeze your left glute.
Why?
According to Robyn Campiobinaca, PhD, and Dr. Ray Long, when we engage the opposite side lattisimus dorsi muscle from the opposite side gluteal muscle, we help stabilize the SI joint. This way of stabilizing the joint is called “forced closure”. You can click on the image below for my Favorite Find to listen to Robyn’s podcast on the importance of this concept and lat/glute engagement in twists. I chose this picture (even though it’s not a twist) so you could see how Robyn hooks herself up to sensors to determine what muscles are being engaged in different variations of poses. Cool, right?
One inspiring tip:
Begin your twist with your back knee on the ground. Feel the engagement of the opposite glute from the way you are twisting (twisting to the right, you would engage the left glute). Now, keep that glute engaged as you lift your knee and come into the full expression of the pose. Last, make sure to also activate the lat on the side to which you are twisting by drawing that shoulder blade down and into your back.
One inspiring song:
One inspiring quote:
“Looking behind I am filled with gratitude.
Looking forward I am filled with vision.
Looking upward I am filled with strength.
And looking within I discover peace.”
– Apache prayer
One inspiring cue:
Come into revolved side angle pose and, if you notice any rounding (flexion) in the lower part of the spine, try stretching the crown of your head directly forward and slightly tilt your sit bones up.
Why?
Rounding of the low back in a twist as deep as revolved side angle can be a common thing you see in your students. There are many factors that contribute to this, including a simple lack of awareness to find spinal length as they twist or if they are struggling to get their bicep/elbow outside of the thigh. The cue of extending the crown of the head forward and tilting the sit bones up can help get their low back into more of a neutral versus rounded position.
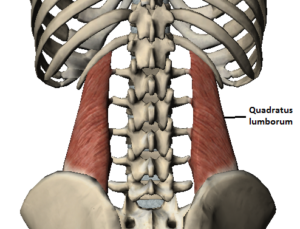
The anatomy behind the benefits of this cue is that it activates the QL muscle (quaddratus lumborum – see image below) which is responsible for unilaterally sidebending and backbending. In a twist, engaging the QL muscle on the side to which you are twisting (twisting to the right and engaging the right QL), will bring a more rounded/flexed lower back into slight extension, providing length and getting the spine closer to neutral.

Note: Depending on a student’s back structure, a little flexion or extension will feel better. I always say to “try the cue on for size” and, if it doesn’t fit with their body, let it go.
One inspiring tip:
Before coming into the twist, either stand or kneel with your back slightly rounded forward. Place both of your middle and index fingers on your low back with your fingers facing down and touching the top of your pelvis. Then, place your thumbs up at your low ribs and feel those two areas draw a little closer together as you engage your QL muscles. You should notice this action helps to lengthen your spine a little bit more. You can play with the balance of slight rounding in the low back and slight extension to find the alignment that feels the best for you. Note that if a student has stenosis, slight rounding may feel better.
As you know by now, there are many benefits to practicing poses in different ways. A twist, for example, can be practiced active or passive. If you missed the Mini Training from week 2, click below to take a look at the benefits of each and experiment with practicing your twists both ways!
One inspiring song:
One inspiring quote:
“The more awake one is to the material world, the more one is asleep in spirit.”
– Rumi

