
DANCER’S POSE/NATARAJASANA

I will load each week’s content below in the tabs. The most current week will show first in blue, but you’ll be able to click the boxes in grey beside the blue tab to view previous content.
One inspiring cue:
Once you grab your foot in Dancer’s pose, first find neutral in your spine and pelvis. As you hinge forward, begin finding more extension in the lifted leg by MOVING YOUR LEG (HEAD OF FEMUR) UP AND AROUND THE BACK OF THE PELVIS. Your pelvis will most likely tilt forward a little bit, but let the action of the leg lifting up and around the pelvis be what takes you even deeper into the pose. This has been a true game changer for me!

Why?
Finding more extension in the lifted leg, when done properly, can make the pose both safer and deeper. Susi Hately, author of Anatomy and Asana: Preventing Yoga Injuries says, “For the legs to move into extension, the femurs must move into extension at the hip joints. For femurs to move this way, the pelvis must remain stable. From a stable pelvis, the gluteus maximus and hamstrings contract, causing the femurs to lift into extension.”
Note: Remember that cues do not work for all bodies as we are highly unique in our structure. This cue, for my body, has made any backbend that I practice not only feel deeper, but much more comfortable/stable. I highly recommended scrolling down and giving this week’s tip a try as a way to begin working with the cue.
One inspiring tip:
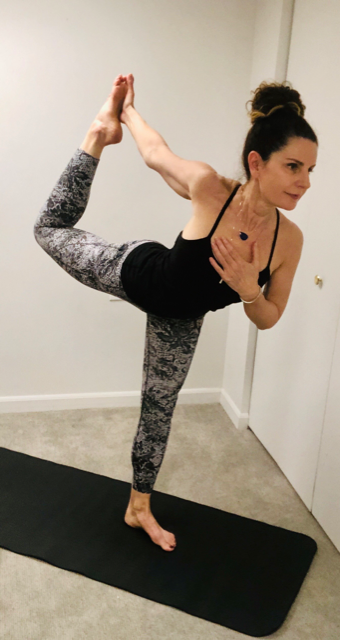
Come all the way into your Dancer’s pose with a neutral spine and your heel close to your glute (see image below). Once you’ve arrived and feel balanced, lift your leg up towards the sky with minimal movement in your pelvis. Your upper back (thoracic spine) will move into extension (deeper backbend) as your leg moves into extension from the lifting action.

One inspiring song:
One inspiring quote:
“Just when the caterpillar thought the world was over, it became a butterfly…”
– Proverb
Find a strong Dancer’s Pose where you are hinging forward and in a backbend that feels good for your body. Then, as you push down into your standing foot, push the hip crease of that standing leg back as your chest draws forward (if you are standing on your right foot, you are pushing the right hip crease back). Did you feel your backbend deepen just a bit?
Why?
You’ve heard of the psoas muscle, right? Check out the image below if you need a refresher. The psoas is partly responsible for arching the low back and therefore plays a significant role in backbends. While we still want to work on comfort and length in the low back, the cue to draw the hip crease back and lift the chest will help to activate the psoas and assist in creating the shape we strive for in Dancer’s Pose.
Dr. Ray Long, who is both a surgeon and a yogi, says the following about the psoas and Dancer’s Pose. “The psoas and adductor groups engage to position the standing leg. Note how the psoas connects to the femur, aiding to arch the back. This muscle also wraps over the front of the pelvis so, accordingly, contracting the psoas tilts the pelvis and trunk forward.”

Good prep work is important when practicing any backbend to help you feel both more open and stronger in the pose. For a great article with tips on how to open the upper back for your backbends, click here or on the image below to go to one of this week’s Favorite Finds.

Also, I have another class ready to go for you! Click here to check out the newly uploaded Restorative Practice on my web site under “Free Yoga Classes.”
One inspiring tip:
Since I love using the wall straps whenever I can, I came up with this variation for Dancer’s Pose. Make sure the strap is around your hip crease as you set up (see image below). I think it’s easier to start with the standing knee bent and then, once you hinge forward, straighten our that leg to find your fuller expression of the pose. Work with the cue above and pull you hip crease back as you draw your chest forward. If you feel you still need more length for comfort in your low back, check our my cues from weeks one and two here.

After you finish practicing the pose, you can use the wall straps to stretch out in a supported Down Dog like this:

Want to try this tip but don’t know how to set up wall straps at home? I’ve got you covered! Just click here to head over to my web site for a video to show you how!! It’s posted under the “Free Yoga Classes” tab.
Finally, if you don’t have yoga straps at home, you can easily purchase them online. I now have a “shop” page on my site where I’ll be sharing my favorite yoga accessories. Check it out here!
One inspiring song:
“Fly Away” by DJ Taz (I love this version of the song!)
One inspiring quote:
“If you want to be happy, be happy on purpose. When you wake up in the morning, you can’t just wait and see what kind of day you’ll have. You have to decide what kind of day you’ll have.
Higher thoughts.
Higher vibration.
Higher energies.
Higher frequencies.
Higher experiences.”
One inspiring cue:
Stand on your left leg and grab your right foot with your right hand for Dancer’s pose. Then, move the right side of your belly slightly towards your left standing leg (this can and should be practiced on both sides, but for clarity of explanation, let’s stick with standing on the left leg).
If you need help keeping your spine long, you can brush up on week one’s cue here.
Why?
This small action will keep you from letting the left hip (standing leg) open up too much. While there may be some opening in the hip (depends on how you’re anatomically built), we want to prevent the hip from opening up too much, as that can create more compression in the low back on the left side. As you move your belly slightly towards your standing leg, you will notice the back hip (right) closes a bit, and you will feel more space in your left low back. Give it a try on both sides!
Click here or on the image below to watch this week’s Favorite Find video on my web site. Along with some great tips for Dancer’s pose, you will learn the symbolism behind having the shape of the pose create an even circle. This week’s cue will also help you do that!!

One inspiring tip:
Using a bolster to prep for Dancer’s pose is something I love to do because it helps create more length in the front body, including the chest and hip flexors.
Begin by lying on your stomach with a bolster under your thighs and/or your belly (image 1 below). Mimic Dancer’s pose by reaching one hand back for the foot on that same side (image 2). See how this feels…you will want to experiment with where the bolster feels best for you. If that feels good, you can try reaching back for the other foot as well (image 3).
Image 1:

Image 2:

Image 3:

If you don’t have a bolster, you can try two firm pillows or click here and head over to the shopping section of my site where you’ll find some of my favorite yoga accessories.
One inspiring song:
“September Song” by Agnes Obel
One inspiring quote:
“Gratitude is the best medicine. It heals your mind, your body, and your spirit. And attracts more things to be grateful for.”
– Live Purposefully Now
A few weeks ago, before the full outbreak of COVID-19, I decided on Dancer’s pose for the theme this month. It’s a pose that can both look and feel beautiful. In brushing up on my Dancer’s pose knowledge, I was reminded that Shiva, the G-D that is represented in the pose, is known as “The Great Destroyer.” How apropos! To learn more about the story behind the pose, click here for one of this week’s Favorite Finds.
When you take the lessons learned from the myth of this asana and apply them to our daily lives, we are reminded not to get stuck “dancing” through old habits that are not serving us.
Now is the perfect time to break free from these habits as the world situation is forcing us to change how we live.
In an article I read that described the spiritual benefits of the pose, it stated, “When we can break free from our old patterns, embrace change and tap into our divinity, we can finally be free of suffering!”
Let’s work together to apply this in our lives and in our yoga practice with a real presence of continued learning and growth.
 One inspiring cue:
Come into Dancer’s pose with your right leg lifted and your right hand to the in-step of your right foot. Then, bring your left hand to your heart.
As you inhale, simultaneously feel your heart stretch towards your left hand and then slightly up.
Why?
When working in any backbend, many of us tend to move through the path of least resistance, which usually means collapsing into the low back.
Placing your hand on your sternum gives you a focal point to direct your breath so that when you inhale, you consciously create a little move opening and movement in your upper back.
Anatomically, your cervical spine (neck) and lumbar spine (low back) have a greater range of motion. Thus, it is easier to move into a backbend from these specific areas in your back (vs. opening the upper/thoracic spine).
According to Susi Hately, author of Anatomy and Asana, when we move into backbends from the areas in our backs that are the easiest to move from, we can end up “jamming in the lower back.”
I’m sure you know the feeling! This is why you hear so many instructors tell you to “open around your heart” before attempting any backbend.
We’re trying to create some extension in the thoracic spine to help take any extreme movement in the lumbar spine. Make sense?
Keep in mind that your thoracic spine (low ribs up to the bottom of your neck) does not have the capability to backbend/extend the same way your low back does.
So, do not expect a considerable curve in your upper back but, rather, just enough to help take the pressure our of your low back.
 Click here or on the picture for another Favorite Find!
The links will take you to my web site where there is a video I made to show you how you can create more range of motion in your thoracic spine.
Note: I forgot to mention in the video to not let your rib cage flare open too much. Try and keep your low back long so that the gentle backbend is coming from your mid-back, not your low back. Even if you’re not looking to do backbends, this particular exercise will help you take fuller breaths…which we can all use right now!
One inspiring tip:
Before coming into Dancer’s pose, do the backstroke with your arms a few times. Not only is it kind of fun, but you warm up the shoulder joints a little more before grasping your foot.
One inspiring song:
“Breathe It In” by Beautiful Chorus
This is a perfect song to play as you are experimenting with this week’s Favorite Find video and working on thoracic spine lengthening and heart opening.
One inspiring quote:
“We can complain that the rose bushes have thorns, or rejoice because thorn bushes have roses.”
– Abraham Lincoln