
How A Few Changes in Chaturanga Can Impact Your Yoga Practice

FINALLY, THE “BEST” WAY TO PRACTICE CHATURANGA ACCORDING TO THE MOST WELL KNOWN AND RESPECTED INSTRUCTORS.
All right, I’ll let the cat out of the bag in my first sentence. There is no “best” way to practice Chaturanga.
I will take you on a yoga journey in this blog post to explore the many ways one can practice Chaturanga, (eg. The Yoga Pushup). My mission is to persuade you that there is no one “right” way to practice the ubiquitous Chaturanga, and the goal should be for you to discover the alignment that feels best for your body.
With a little detective work (ok, a lot!) on my end, I hope you will be open to learning and understanding a little more about why certain cues are used and explore the alignment that is most beneficial for you.
While writing this blog post I poured over the abundant online videos and articles on Chaturanga by many of the well-known magazines and yoga instructors.
My concern is that as a newer student or instructor, we read or see a way to practice this pose and just assume it must be the “right” way.
Let’s start by discussing the different alignment cues you may have been taught over the years and then follow up with the benefits of the different cues.
Understanding why instructors say what they do will help to carve out a path that is safe and strong for your body. And if you’re an instructor, understanding the following reading will hopefully inspire your teaching.
It’s hard to suggest whether or not you were taught the “right” way, but you probably learned a “correct” way. Some instructors get downright militant about alignment and Chaturanga. There’s nothing wrong with an instructor believing that their way is THE way so long as that instruction takes into account each student’s unique physiology and capabilities.
Each of us is built differently and it is unlikely that strict alignment is appropriate for the dozens of different body types found in a typical class.
The issue, from this teacher’s perspective, is that students tend to do exactly what the instructor says, and many instructors tend to teach the exact way they were taught. I believe that there are pros and cons to practicing Chaturanga in different ways depending on where your strengths, weaknesses, or injuries are.
No doubt you have heard at least some of these cues:
- “Knees, chest, chin”
- “Draw your shoulders back and squeeze the shoulder blades” “Only lower half way down”
- “Hug your elbows in by your waist”
- “Take your hands and elbows wider”
- “Keep a 90 degree bend at the elbow joint”
- “If you’re on your third day in a row of vinyasa, just hold plank pose” “Add an extra Chaturanga”
OY VEY, WHAT IS THE RIGHT WAY?!
Let’s dig into these and other cues and then consider what some of the most respected instructors say about Chaturanga.
Knees, Chest, Chin
When I first started practicing yoga over 25 years ago I was taught to dip the shoulders, drop my knees, stick my bum up and glide into Updog. I still see students practice it this way. I have my issues with this method of practicing Chaturanga because I think it’s too easy to let the shoulders collapse forward, but I don’t object when it’s done without letting the shoulder joint move around in the socket.
Squeeze the Shoulder Blades
Ah, you remember this cue, I’m sure. The instructors said something like, “Imagine a pencil between your shoulder blades and squeeze it as you lower down.” For some students this may be appropriate, but as we’ll discuss, it can cause problems for some.
The Kitty – Only Lower Half Way Down
There’s an instructor who leads workshops around the country who uses a stuffed animal kitty to help demonstrate his proper version of Chaturanga. He places the stuffed toy under his chest and asks the students to only lower enough (about half way) so as not to hurt the kitty. Cute!
This is probably the most common cue we hear today. Some instructors substitute the kitty with another object under your chest, like a block, to emulate the same cue. Others suggest putting straps above your elbows to keep you from lowering down too much.
One last often suggested cue to keep you from dipping too far down is to bend the elbows to a 90-degree angle and not deeper. There is good reason for this as you will soon see.
Elbows Over Wrist
The idea here is to create a 90-degree angle at the elbow joint. As you lower down and bend the elbows, a 90-degree angle is seen at the elbow joint. This does not work for my body, or for many students’ I see, and I’ll explain why shortly.
Elbows Wide
In some of the reading I’ve been doing lately, I’ve noticed instructors cueing to have the hands a little wider and to point the elbows out a little bit. This cue is kind of new in the yoga world but may have some good reasoning behind it which you will very shortly see.
Repetition
How many should you do to improve strength? How many is too many so you don’t create repetitive stress to the joint?
IS THERE A “RIGHT” WAY TO DO THE YOGA PUSH UP?
- Why does melatonin work for some and not others?
- Why can some athletes play professional sports into their late 30’s and early 40’s and some have to stop in their late 20s and early 30s due to injury?
- Why are there just as many arguments and research saying paleo diet is best for your heart and others saying vegan is?
- Why is CPR taught differently now than it was 10 years ago?
And the correct answer is. . . that there there is not a one size fits all. Because we are all built differently, we learn over time and are able to adjust the way we do things based on our experience, research and changing physical capabilities.
Our bodies respond differently to the same vitamins, physical activity, and diet. Each person is unique inside and out.
We react uniquely to everything from weight lifting and yoga to the medicines we take. Some have more slow twitch muscle fibers making us better endurance athletes while some of us have more fast twitch muscle fibers making us better at short distance running and weightlifting.
Some of us don’t have enough insulin to break down sugar like our friends and neighbors and some of us are born with an extra bone, shorter or longer ligaments, or genetically prone to shoulder, back and knee issues.
With all of this in mind, the most often asked question by new students is, “what is the right way to do this pose?” The answer? It depends upon quite a few factors.
Your Chaturanga should not be set in stone. I’m not saying to throw it all to the wind and screw the alignment – I’m saying be open to learning what works best for you.
If your shoulders or wrists bother you, if you’re newer to yoga, or if you’ve already practiced 3 days in a row, playing a little bit with varying the alignment may be beneficial for you.
I think first and foremost you need to know if the instructor is knowledgeable in the understanding of the body. With most yoga certifications there is only 10 hours of hands on anatomy required!
I am not saying that this means they don’t know the alignment, rather, they may not be versed in understanding the differences in alignment and why a certain cue may be appropriate for one student and not another.
I am of the belief that if you are in a class, or teaching a class (assuming it’s a class that is mostly poses vs. meditation), instructors should continuously study the biomechanics and anatomy of the body.
Students assume yoga instructors are knowledgeable about the body, but what they need to realize is that many instructors learn a specific way to teach and then just do exactly that.
I don’t necessarily have a problem with this- I believe most instructors do their best to teach from a place of good intention. The problem I have is many students believe the instructor knows how to teach a pose when a student complains of pain or has an injury, and this oftentimes is not the case.
DON’T JUST READ OR HEAR SOMETHING IN YOGA AND ASSUME IT TO BE “RIGHT” FOR YOUR BODY.
I rarely read an article and just assume it to be true. I ask first, does it make sense to me? In other words, does the writer explain why they are saying what they are saying?
I make sure the author is someone well versed in anatomy and/or biomechanics. I tend to refer to three to five regular author/instructors, looking through their writings for common denominators.
Because the authors I follow are a diverse group (one is an orthopedic surgeon, one is a physical therapist, one is a regular doctor, and a few are just instructors who have spent the last 20-plus years studying the body), they rarely offer the exact same answer to a similar question. However, there are often common threads that help to bind their disparate views.
In the remainder of this blog post I will highlight why the cues I have listed are taught. With practice and attention, you can decide which cues/alignments are right for you.
Side note: When I teach group classes I cue like everyone has a shoulder or back issue. This way, I feel like I’m cueing in the safest way I know how, while allowing my students to explore variations in the poses that feel good for them.
In group classes, with so many students in the room (many whom are between 35 and 60 in my classes) I have no idea who may be on the verge of a herniated disc, have wear and tear (Ray Long says over half of people in their 40s have a herniated disc and don’t know it), or may have arthritis, tendinitis, or impingement in their shoulders.
Indeed, the student may not even know. Also, I don’t consider myself an expert and am always learning, but I do feel like I have a pretty good grasp of the body (you can read my bio) and can help you to navigate your way through conflicting information and instruction.
LET THE DETECTIVE WORK BEGIN: THE DIFFERENT CUES ON CHATURANGA FROM INSTRUCTORS I RESPECT
Judith Lasater
WHAT JUDITH SAYS: Judith is a long-time instructor and a physical therapist. Judith suggests that, “the ability to practice poses requiring strength from the shoulder joint depends on stabilization of the scapula.” Read that again please. How do you know if the scapula is stable?
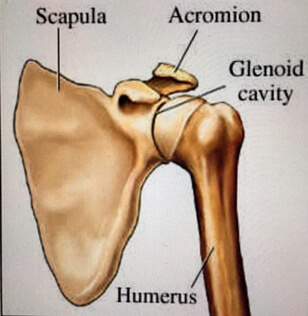 THE BREAKDOWN: When the shoulder blades are in neutral, which partly means flush on the back, the glenoid stays in a neutral position, giving you the most power in the shoulder muscles.
Picture a golf ball (head of your arm bone) and a golf tee (glenoid, which is like a little cup in the shoulder that the head of the arm bone rests in).
When the golf ball (head of arm bone that meets the shoulder) is centered on the golf tee (the cup like shape that meets the arm bone at the shoulder), it is called neutral. You may have figured out by now the golf ball (head of arm bone) is bigger than the golf tee (glenoid cup).
This allows for good range of motion and is good for movement, which we need, but our stability of the shoulder joint is just as important if we are to keep the shoulder healthy.
So when the head of the arm bone is moving around in the shoulder socket in Chaturanga, it is a sign that the musculature around the shoulder joint is not firing properly.
Dr. Loren Fishman, MD
Dr. Fishman is a professor at Columbia College of Physicians and Surgeons. In the book Yoga For Arthritis written with Ellen Saltonstall, Dr. Fishman suggests, “The pure and simple nature of the movements, however, in no way substitutes for understanding the joint.” In other words, if you just teach the pose with little knowledge of biomechanics, and without acknowledging that we are all built differently, you may be doing a disservice to many of your students.
In his book he compares wall push-ups and Chaturanga. In this thought-provoking comparison, Dr. Fishman suggests that while the angle used between wall push-ups and Chaturanga is different, the alignment principles are the same. The reduced angle of the wall push-up can put less pressure on the joint.
WHAT DR. FISHMAN SAYS: The cueing they use for wall push-ups is “not to disturb the shoulder alignment as the arms move.”
THE BREAKDOWN: What he means is to not let the shoulder move around as you bend the elbows. Remember, the more stable the shoulder blades are on the back, the more balanced the musculature around the shoulder, the less movement of the head of the arm bone in the socket, which means less wear and tear of the shoulder joint.
WHAT DR. FISHMAN SAYS: Fishman and Saltonstall also instruct that when doing wall push-ups one should engage the muscles of the shoulder blades to pull the shoulders back.
THE BREAKDOWN: I believe they are using this cue to encourage students not to dip down in the shoulders. It is important that the rhomboids (upper back muscles) are strong and engaged. But this is a good example of a person’s physical ability and experience determining how relevant this cue is for them.
Take, for example, a fit student who has been practicing for a while and does not dip down in the shoulders during Chaturanga. If they follow the cue and pull their shoulders back they are now drawing the heads of the arm bones out of neutral.
If you’re someone who knows they are pretty strong in Chaturanga (shoulder blades fairly flush and stable as you move through the yogi push-up), then the cue to pull the shoulders back may not be for you.
Doug Keller
Doug Keller is a long time yoga practitioner. He travels internationally leading trainings and is an adjunct professor in the master’s degree program in yoga therapy at the Maryland University of Integrative Health.
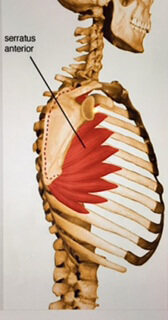
Doug Keller, in his book Yoga as Therapy, is the first one so far to talk about “winging” of the shoulder blades. In the last 10 years (or at least that’s when I started reading more about it) with increasing numbers of physical therapists, doctors and other body workers embracing yoga, a consensus has formed that if the shoulder blades are ‘winging’ off the back it is a telltale sign that the shoulder joint is not being supported properly.
 WHAT DOUG SAYS: Doug Keller suggests that a head forward (chin jutting down), or hyperextended back (chin jutting up) can create an imbalance of the shoulder blade muscles.
He says this imbalance can cause winging which puts pressure on the biceps tendon and rotator cuffs. Weakness of the serratus anterior muscle is the main culprit when it comes to winging.
THE BREAKDOWN: Keller’s implication is that the position of your head can affect the ability of your shoulder muscles to fire properly. I firmly believe this! Remember the song “Dem Bones”?
Everything’s connected! I have to tell you that, and I’m being serious, since working on writing blogs and my website, because my head is down so much, I have developed some serious discomfort in my shoulders! So here’s a Yogi Detective tip for you:
Don’t let the chin stick up or let the head hang down. This can create an imbalance and over time cause inflammation.
WHAT DOUG SAYS: “A flat thoracic spine can give the appearance of ‘winging’, but true ‘winging’ is a matter of how integrated and coordinated the movements of the shoulder blade with the humerus are especially when taking the arms toward the front of the body (flexion) or overhead.”
THE BREAKDOWN: I have seen students who have some winging in the shoulder blades, but who still demonstrate good alignment. In this situation “good alignment” means that when a student lowers into Chaturanga, the shoulder blades are down the back and the head of the arm bone (humerus/golf ball) isn’t rolling in.
To encourage good alignment for this student I would first make sure the student is using the serratus (pushing floor away as lower down), and, if so, perhaps their thoracic spine is a little flatter than most.
I think the takeaway from this is not to just assume if you see some winging that the student must not have the strength. Look at the stability of the shoulder blade and the movement of the arm bone. If you see the arm bone collapse in, then its a problem. Keller continues:
“With the arms at to the side and it’s Chaturanga, pectoralis major works less efficiently, and pectoralis minor tends to shorten, pulling on the coracoid process. On the other hand, if the arms are placed out to the sides (as in a ‘military push-up’), pectoralis major is lined up to work more efficiently in helping with the ‘push’ of the push-up.” He also suggest its less strain on the biceps tendon and rotator cuff and helps to correct imbalances.
“Because of the arm position of Chaturanga Dandasana, with the elbows close to the side body (compared to a ‘push-up’), Chaturanga places much more of a load on the pectoralis minor and the anterior deltoid, while not aligning pectoralis major for efficient use.”
THE BREAKDOWN: Keller’s comments are both interesting and insightful. I see students (my husband, for one) who are strong and have very good alignment (shoulder blades flush on back and head of arm bone not moving too far forward or back).
What Doug is saying, however, is that if you drop below that 90 degree point you have a greater risk of straining the shoulder joint due to numerous factors.
You may be thinking, “what the heck is he talking about? Arms out to the side in Chaturanga . . . no way!” If he’s right, as I believe him to be, and you are not strong enough in a balanced way (this doesn’t mean you are not strong- just not strong AROUND the joint), you may be setting yourself up for injury. I wish I had known this 10 years ago!
Try a regular old fashioned push-up if you’re feeling weak in Chaturanga. Build up your strength there and then work toward traditional Chaturanga.
When the elbow is close into the side of the body, we are not using our pec major as much as we would in a push-up. This places much more load on the anterior deltoid.
I’m guessing this is a fairly new observation for you, as it was for me. However, when I practiced as the author suggested, I felt stronger and more supported.
To those who might be feeling a bit overwhelmed, please know that I have been practicing yoga for 25 years and can do handstands, crow, and more, but I still don’t always have the strength to practice Chaturangas in a balanced way. So what do I do? I sometimes just hold Plank and work my alignment there, or if I’m in a class and they are doing multiple push-up Chaturangas, I’ll do military push-ups.
Doug also states that in Plank and Chaturanga, the pull of the pectoralis minor can create winging of the shoulder blades, especially if the rhomboids and trapezius are not strong enough or activated to counter the pull of the pec minor.
What can you do? Strengthen your rhomboids and mid to lower traps. Think rowing action if you do weights or resistance work or Purvottanasana (upward plank pose), and salabhasana (on belly like superman) in a yoga class. I believe using some resistance is extremely beneficial in strengthening these important muscles.
WHAT DOUG SAYS: “The dangers of Chaturanga to the shoulders stem from a number of factors – a principal one being the alignment of the pectoralis minor relative to the bicep tendon when the arms are bent close to the sides of the body. This exerts an extra strain on the front of the shoulder capsule while making it all the more difficult to engage the core to stabilize the shoulder blades.”
He goes on to explain that when the arms are out to the sides in a wide Chaturanga it is less stressful to the shoulder joint because it better aligns the biceps tendon with the coracoid process and pec muscles. When we turn the fingers in a little it helps with the above alignment while allowing for better use of serratus anterior and rhomboids.
Whew!!! That’s a lot!
THE BREAKDOWN: let’s keep this one simple. What you should know is that whether you are feel a little weak in Chaturanga (like me sometimes), or are newer to the practice, widening your hands, letting your elbows go wide and your fingers turn in slightly, may really help to take pressure out of the shoulder joint and help you to strengthen the muscles that will eventually lead to a safe and strong Chaturanga.
If someone is not experiencing pain and can keep their shoulder blades stable as they lower down, without letting the shoulders dip, then I think (and Doug expresses this as well) traditional Chaturanga is fine. But, If you have a new student or someone who you see doesn’t have the strength yet, then suggesting they point their elbows out a bit may be helpful.
David Keil
David Keil has been teaching anatomy in yoga settings since 2000.
WHAT DAVID SAYS: “The position of the scapula can affect which muscles are recruited to do a particular movement at the shoulder joint. If the scapula is not in the “right” position, it is possible that the other muscles, particularly those that move the shoulder joint itself, have to work harder or differently than they are optimally designed to.” He suggests that the problem does not come from the shoulder but, rather, from the scapulae not being able to be held in place because they are not strong enough or don’t have the proper neuromuscular pattern.
THE BREAKDOWN: We now know the “right” position is one in which the shoulder blades are fairly flush on the back as well as pulled down away from the ears. When this doesn’t happen, and other muscles have to pull the weight (literally) that they are not supposed to, this is how imbalances and wear and tear begin in Chaturanga. Obviously we can’t know exactly where the shoulder blades should go on each student. David recommends that teachers insure that students have the strength to hold their shoulder blades stable before asking them to do Chaturanga so the student doesn’t overstress the joint.
WHAT DAVID SAYS: “The further forward the shoulders are from the hands, the more strain there will be in the shoulders, because the bulk of the upper body is too far forward to be supported by the hands. Therefore, do not apply yoga’s general rule of stacking the joints to the wrist and elbows in Chaturanga. This position also increases the wrist angle and can cause problems there too. Most people should have their elbows slightly behind their wrist.”
WHAT I SAY: HALLELUYAH!
THE BREAKDOWN: When the shoulders are further forward (this is the 90 degree angle at the elbow cue) in Chaturanga, there is more weight that is transferred to the shoulder joint…gravity is powerful. By having your hands slightly in front of the elbows it helps to center the weight and take some of the pressure out of the shoulder joint. Not only that, but by having our hands slightly forward of the elbows we decrease the extension in our wrist helping to take pressure out of the wrist. Can I get a woot woot! This is so much better for my body.
WHAT DAVID SAYS: “Another potential risk for the shoulder is when students practice too much, too soon. This alone can inflame a number of areas in the body, especially the shoulders.” His suggestions for beginners (or I’ll add anyone experiencing discomfort) is to put your knees on the floor. The other is to bring your hands slightly wider out to the sides and let your elbows move away from your rib cage a bit.
THE BREAKDOWN: When we allow ourselves a break from doing the same workout or activity, it allows the specific muscles used to regenerate and recover. Doing 10 Chaturangas three days in a row is much different than doing 30 or more. If you’re on your third or fourth day in a row of a Vinyasa class, perhaps try holding plank instead of taking all the Chaturangas or even take your hands a little wider and elbows out (more like a traditional push up) which seems to be easier on the shoulder joint.
As with so many Yoga journeys, we have come full circle. Hopefully I’ve shared some expert information and insight that will help you to find the most healthful and enlightening path to the Chaturanga that’s right for you.